Frequently Asked Questions

Backup & Restore

How do I create a backup of my data?

To create a backup:

  1. Open NourAIsh and go to Settings
  2. Tap Backup & Restore
  3. Tap Create Backup
  4. Choose where to save your backup file (Files app, iCloud Drive, etc.)
Settings screen showing Backup & Restore option

Your backup will be saved as a .nouraishpack file containing all your nutrition entries, weight records, blood pressure data, and settings.

How do I restore from a backup?

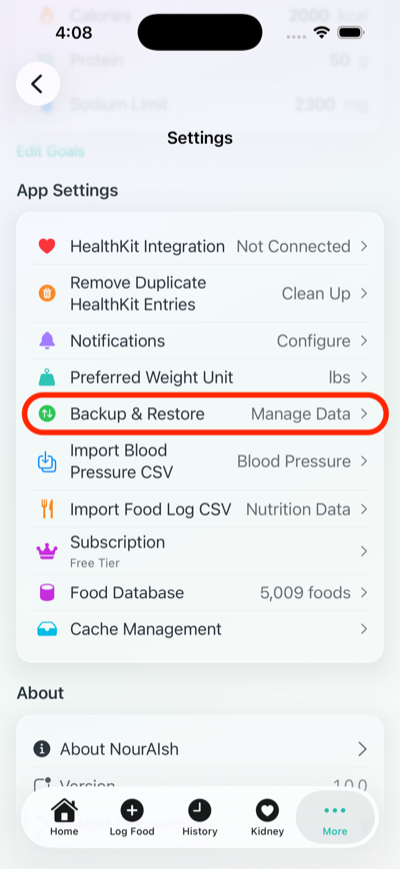
To restore your data:

  1. Go to Settings > Backup & Restore
  2. Tap Import Backup
  3. Select your .nouraishpack file
  4. Review the backup information (date created, device, entry counts)
  5. Choose a restore mode:
    • Merge with existing data - Adds backup data to your current data
    • Replace all data - Deletes current data and replaces it with the backup
  6. Tap Restore
Restore confirmation screen showing backup info and restore mode options
Tip: If you choose "Merge," duplicates may occur if you have overlapping data. Choose "Replace" for a clean restore.
Where are my backups stored?

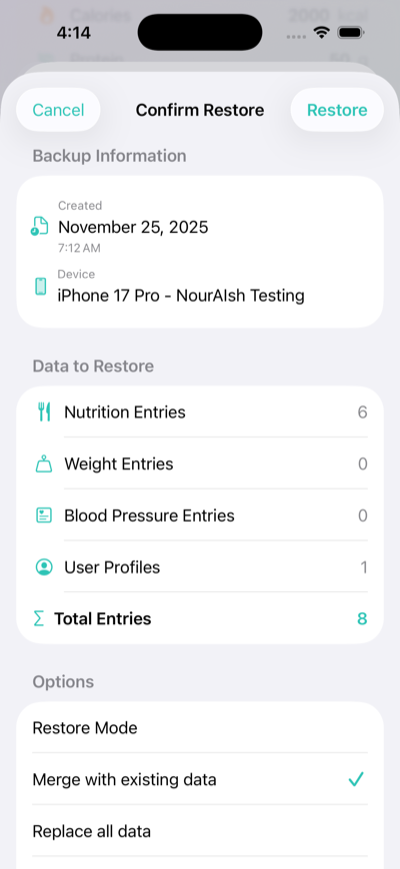
When you create a backup, you choose where to save it. Common locations include:

  • iCloud Drive - Automatically synced across your Apple devices
  • On My iPhone - Stored locally in the Files app
  • Other cloud services - Dropbox, Google Drive, etc. (if installed)

Backup files are named NourAIsh-[date]-[id].nouraishpack for easy identification.

Can I set up automatic backup reminders?

Yes! NourAIsh can remind you to backup your data:

  1. Go to Settings > Backup & Restore
  2. Under Reminders, select your preferred frequency:
    • Never
    • Weekly
    • Monthly

You can also see when your last backup was created in this section.

What data is included in a backup?

A NourAIsh backup includes:

  • All nutrition/food entries
  • Weight entries
  • Blood pressure entries
  • User profile and settings

The backup file shows you exactly how many entries of each type are included before you restore.

Meal Reminders

How do I set up meal reminders?

To enable meal reminders:

  1. Go to Settings > Notifications
  2. Toggle on Meal Reminders
  3. Set your preferred times for:
    • Breakfast
    • Lunch
    • Dinner
  4. Select which days of the week you want reminders
Notification settings showing meal reminder times and day selection
Can I choose which days to receive reminders?

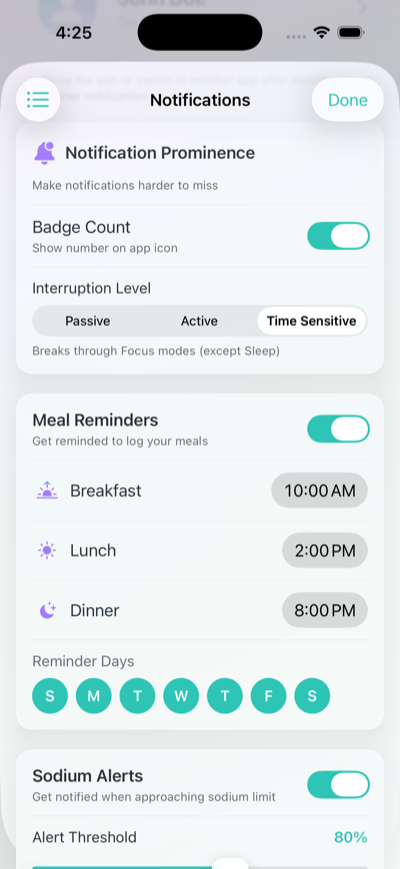
Yes! Below the meal times, you'll see day buttons (S M T W T F S). Tap each day to toggle reminders on or off for that day. Selected days appear highlighted.

This is useful if you have a different routine on weekends or certain days.

My notifications aren't showing up. What should I do?

If you're not receiving notifications:

  1. Check that notifications are enabled in Settings > Notifications
  2. Look at the Notification Permission status at the top of the screen
  3. If it shows "Disabled," tap Settings to open iOS Settings and enable notifications for NourAIsh
  4. Use the Send Test Notification button to verify notifications are working
Tip: After tapping "Send Test Notification," close the app or switch to another app. The test notification arrives in 6 seconds.
What are the notification interruption levels?

NourAIsh offers three interruption levels:

  • Passive - Appears silently in Notification Center only
  • Active - Standard notification with sound and banner
  • Time Sensitive - Breaks through Focus modes (except Sleep)

Choose "Time Sensitive" if you tend to miss notifications due to Focus modes.

What are Sodium Alerts?

Sodium Alerts notify you when you're approaching your daily sodium limit. You can:

  • Toggle alerts on or off
  • Set a threshold (e.g., 80% of your daily limit)

This is especially helpful for people managing kidney health or blood pressure who need to monitor sodium intake.

Logging a Food Item

What are the different ways to log food?

NourAIsh offers multiple ways to log what you eat:

  • Chat with NourAIsh - Describe your meal in natural language (e.g., "grilled chicken with rice and steamed broccoli")
  • Search Food - Search the USDA and Open Food Facts databases
  • Scan Barcode - Scan packaged food barcodes for instant nutrition data
  • Scan Nutrition Label - Use your camera to scan nutrition facts panels
  • Manual Entry - Enter nutrition values directly
  • Recipes - Log saved recipes with calculated nutrition
  • Saved Foods - Quickly re-log foods you've saved before
How do I use Chat with NourAIsh?

Chat with NourAIsh is the easiest way to log meals using natural language:

  1. Go to the Log Food tab
  2. Tap the Chat with NourAIsh card at the top
  3. Describe what you ate (e.g., "2 eggs with toast and orange juice")
  4. NourAIsh AI will analyze your meal and log it automatically

You can also ask nutrition questions, get meal recommendations, and NourAIsh AI recognizes your saved foods and recipes.

Tip: Be specific! "Large grilled chicken breast" gives better results than just "chicken."
How do I scan a barcode or nutrition label?

Scanning a Barcode:

  1. Tap Scan Barcode in Quick Actions
  2. Point your camera at the product's barcode
  3. The app will automatically detect and look up the product
  4. Review the nutrition information and tap Add

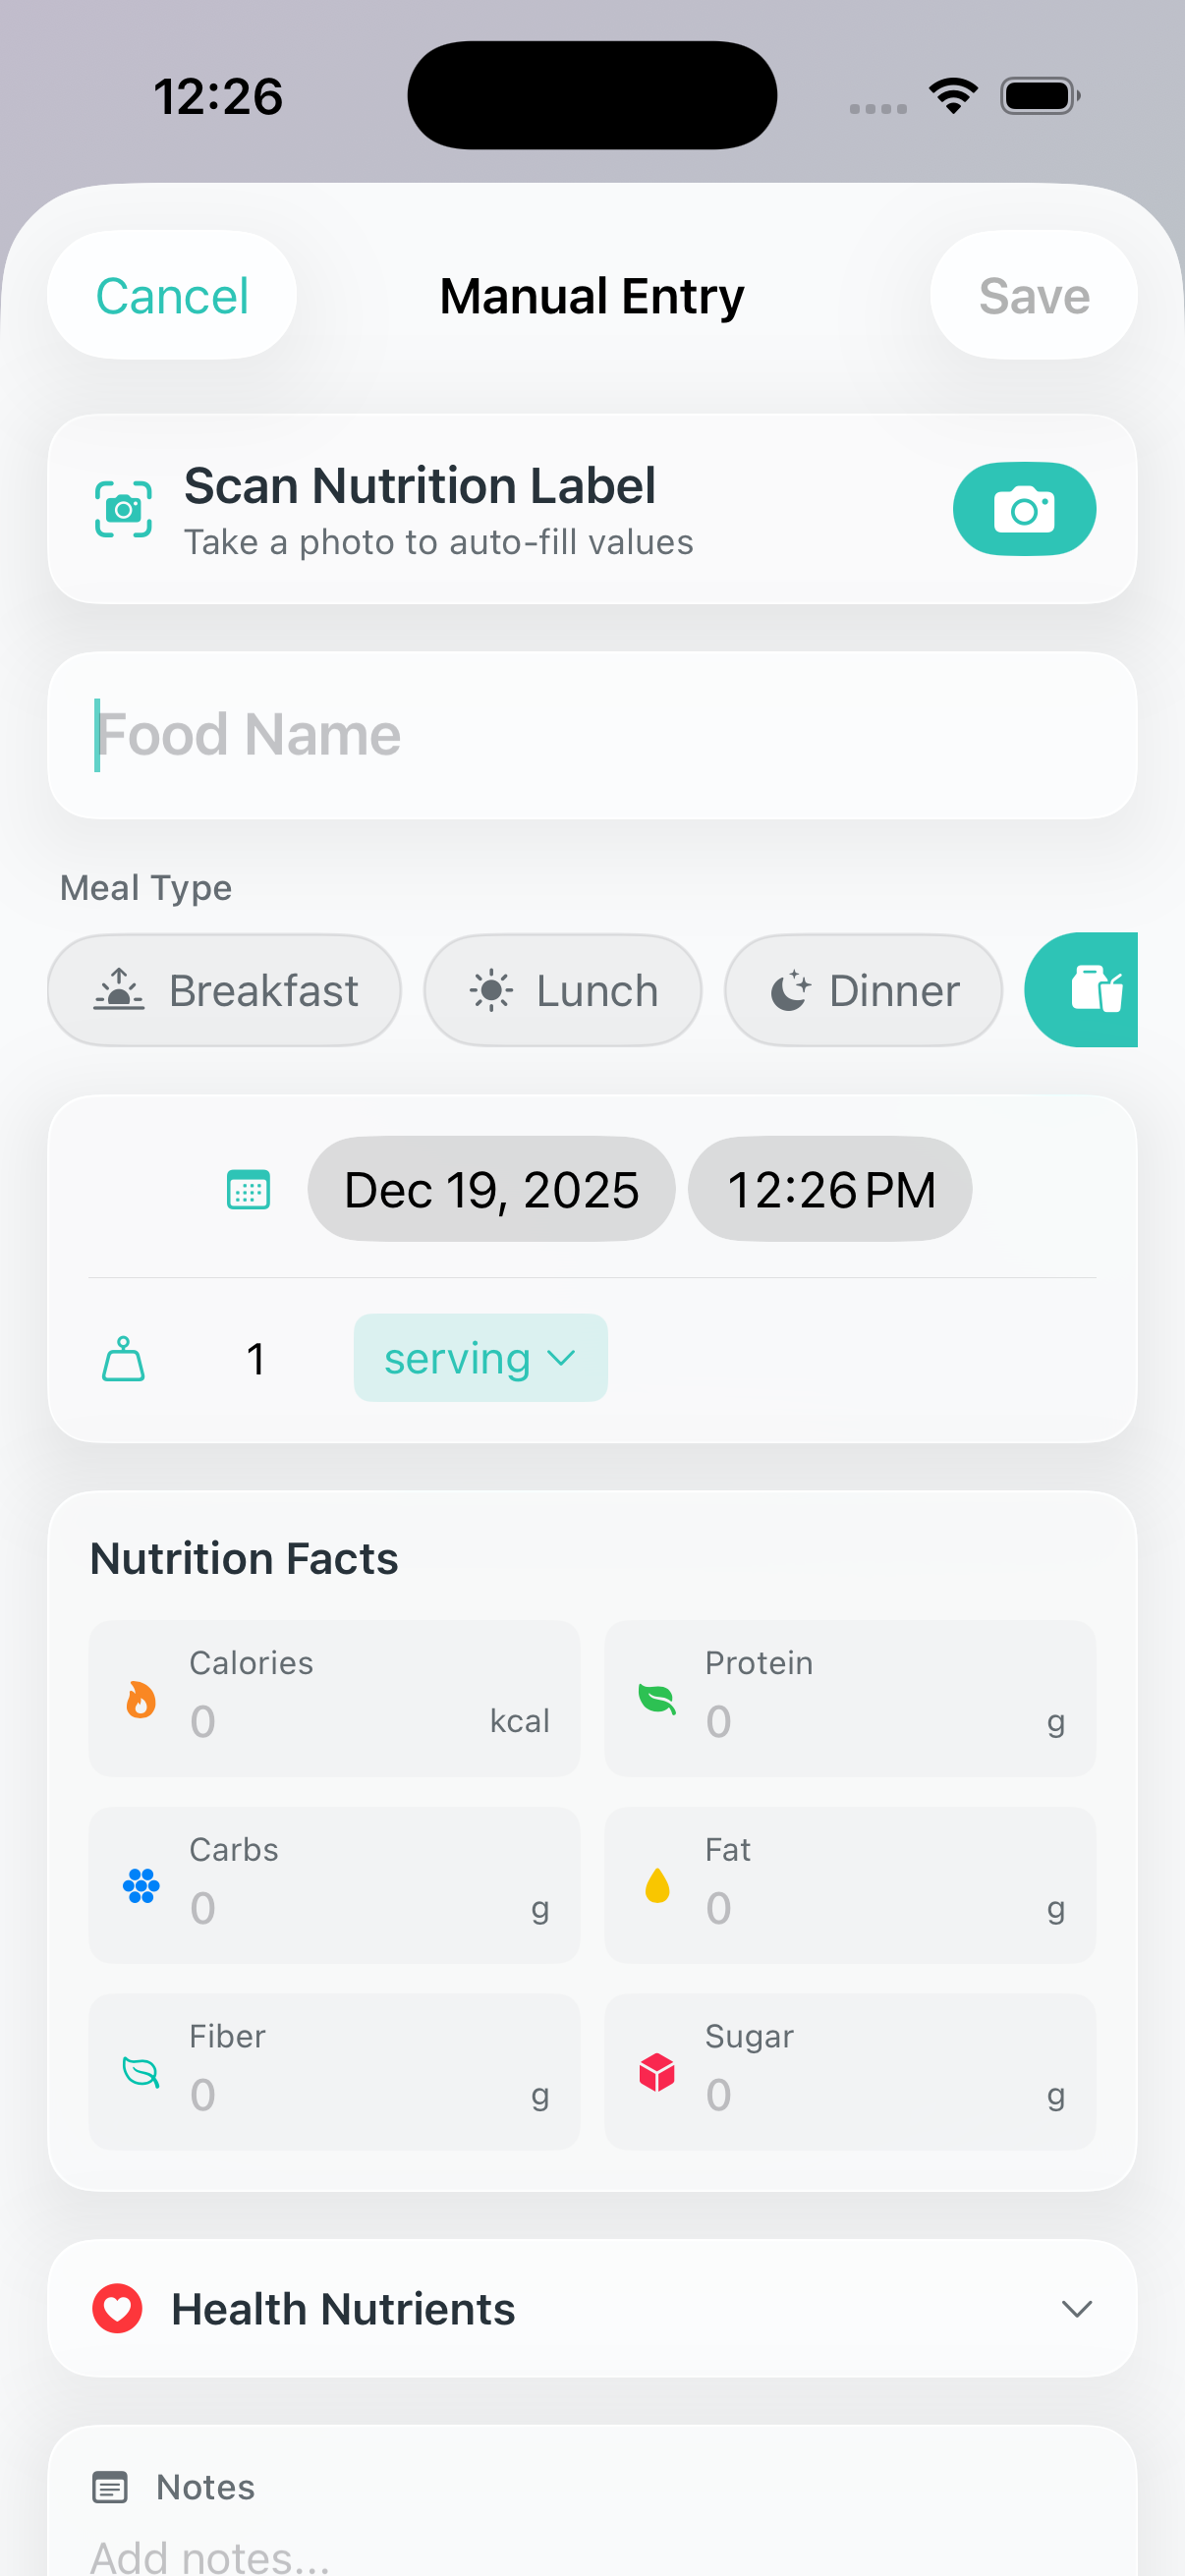
Scanning a Nutrition Label:

  1. Tap Scan Nutrition Label in Quick Actions
  2. Point your camera at the nutrition facts panel
  3. NourAIsh will extract the nutrition values automatically
  4. Review and adjust if needed, then tap Add
Note: Nutrition label scanning works with or without NourAIsh AI. When AI is disabled, on-device OCR is used to read labels—no internet connection required.
How do I manually enter nutrition information?
  1. Tap Manual Entry in Quick Actions, or select a meal type (Breakfast, Lunch, Dinner, Snack)
  2. Enter the food name
  3. Fill in the nutrition values (calories, protein, carbs, fat, etc.)
  4. Tap Save
Manual Entry form showing food name and nutrition fields
What are Saved Foods and how do I use them?

Saved Foods shows items you've saved before, making it quick to re-log frequent meals:

  1. Tap Saved Foods in Quick Actions
  2. Browse or search your saved items
  3. Tap an item to add it again
  4. Adjust the quantity if needed
Tip: You can also long-press any saved food for quick actions like logging or deleting.
Can I edit or delete a food entry?

Yes! To edit or delete an entry:

  1. Go to the History tab
  2. Find the entry you want to modify
  3. Tap on it to view details
  4. Use the Edit or Delete options
Tip: You can also long-press any entry for quick actions like editing or deleting.
What meal types are available?

NourAIsh supports four meal types:

  • Breakfast
  • Lunch
  • Dinner
  • Snack

Selecting a meal type helps organize your daily intake and provides better insights in your history.

NourAIsh AI

What is NourAIsh AI?

NourAIsh AI is an optional feature that enables powerful AI-powered capabilities:

  • Natural language food logging - Describe meals like "grilled chicken with rice and vegetables" and get instant nutrition data
  • AI nutrition label scanning - Enhanced label reading with better accuracy for complex labels
  • Chat with NourAIsh - Ask nutrition questions and get personalized advice
  • AI-powered reports - Get insights about your nutrition patterns
  • Recipe ingredient analysis - Automatically calculate nutrition for recipe ingredients

NourAIsh AI requires an internet connection and is available with a NourAIsh subscription.

How do I enable or disable NourAIsh AI?

NourAIsh AI is disabled by default to protect your privacy. You can enable it:

During Onboarding:

  1. When you first set up NourAIsh, you'll see an "AI Preferences" screen
  2. Choose "Enable NourAIsh AI" to turn on AI features, or "Continue Without NourAIsh AI" to use the app without AI

In Settings:

  1. Go to Settings
  2. Find the NourAIsh AI section
  3. Toggle NourAIsh AI Features on or off

You can change this setting at any time.

What works without NourAIsh AI enabled?

All core NourAIsh features work without AI:

  • Manual food entry - Enter nutrition values directly
  • Barcode scanning - Scan barcodes to find products in USDA and Open Food Facts databases
  • Nutrition label scanning - Uses on-device OCR (no internet required)
  • Food database search - Search 3M+ foods from USDA and Open Food Facts
  • All tracking features - Nutrition, weight, blood pressure, sleep
  • Charts and history - View all your data and trends
  • Recipe management - Create recipes with manual nutrition entry
  • Basic nutrition analysis - Daily reports with personalized insights
Privacy Note: When NourAIsh AI is disabled, all processing happens on your device. No data is sent to external servers.
What data is sent when NourAIsh AI is enabled?

When you use NourAIsh AI features, the following data may be sent to process your request:

  • Food descriptions - Text you type when describing meals
  • Nutrition label images - Photos you take for AI label scanning
  • Chat messages - Questions you ask in the AI chat
  • Recipe ingredients - Ingredient lists for AI analysis

This data is processed to provide nutrition information and is not stored by us. Your food logs, health data, and personal information remain on your device.

Home & Lock Screen Widgets

What are NourAIsh widgets?

NourAIsh widgets let you track your nutrition progress at a glance without opening the app. You can add widgets to your:

  • Home Screen - See nutrition progress alongside your other apps
  • Lock Screen - Quick glance at your daily progress

Widgets are free and update automatically as you log food throughout the day.

How do I add a NourAIsh widget?

To add a widget to your Home Screen:

  1. Long-press on your Home Screen until apps start jiggling
  2. Tap the + button in the top corner
  3. Search for NourAIsh
  4. Choose a widget size and tap Add Widget
  5. Drag it to your preferred location

For Lock Screen widgets, go to Settings > Wallpaper > Customize and add widgets to your lock screen.

What widget sizes are available?

NourAIsh offers several widget options:

  • Small (Single Nutrient) - Shows one nutrient with a circular progress ring. You can configure which nutrient to display.
  • Medium (Rest of Day) - Shows 4-5 nutrients with progress bars, tailored to your health profile.
  • Lock Screen - Compact widgets showing your primary nutrient or a brief summary.
Can I choose which nutrient the widget shows?

Yes! For the small (single nutrient) widget:

  1. Long-press the widget on your Home Screen
  2. Tap Edit Widget
  3. Select the nutrient you want to track (Calories, Protein, Sodium, etc.)

The medium widget automatically shows nutrients based on your health profile (general wellness, kidney health, or heart health).

What do the widget colors mean?

Widget colors indicate your progress:

  • Green - Working toward a goal (calories, protein, fiber)
  • Orange - Approaching a limit (sodium, saturated fat, sugar)
  • Red - Over your limit or goal

The color logic adapts to your health profile. For example, protein shows as a limit (orange) for users with kidney disease.

How often do widgets update?

Widgets update:

  • When you log food in the app
  • Every 15 minutes automatically
  • At midnight when the day resets

If your widget seems stuck, open NourAIsh and it will refresh immediately.

Healthcare Provider Portal

What is the Healthcare Provider Portal?

The Healthcare Provider Portal lets you share your last 30 days of health data with your doctor, dietitian, or other healthcare provider via a temporary web link.

Your provider can view your data in their browser without installing anything. The link automatically expires after your chosen time period.

This feature is free for all users.

What data is shared in the portal?

The portal includes your last 30 days of:

  • Food logs and nutrition - Daily entries and nutritional totals
  • Blood pressure readings - With health category classifications
  • Weight entries - With trend visualization
  • Sleep data - Duration and quality if logged
  • Health profile - Your nutrition goals and health condition settings

No personal identifiers (name, email, etc.) are included - only a random 8-digit verification code.

How do I create a portal link?

To share your data with a healthcare provider:

  1. Go to Settings > Healthcare Provider Portal
  2. Tap Create Portal Link
  3. Select how long the link should be active (1, 6, 12, or 24 hours)
  4. Tap Create Portal Link
  5. Share the link with your provider via text, email, or copy/paste

Your provider opens the link in any web browser to view your data.

What is the verification code?

When you create a portal link, a random 8-digit verification code is generated (e.g., "04829163").

This code appears on both your phone and the web portal. You can share it verbally with your provider to confirm you're both looking at the same data.

The verification code is the only identifier on the portal - your name and personal information are never included.

Can I revoke access before the link expires?

Yes! To revoke access immediately:

  1. Go to Settings > Healthcare Provider Portal
  2. You'll see your active portal with the countdown timer
  3. Tap Revoke Access

The data is immediately deleted and the link will no longer work.

Is my data secure?

Yes, the Healthcare Provider Portal is designed with privacy in mind:

  • No personal identifiers - Only a random verification code identifies your data
  • Unguessable URLs - Portal links use 32-character random IDs that cannot be guessed
  • Automatic expiration - Data is permanently deleted after your chosen time (1-24 hours)
  • Manual revocation - You can delete the data anytime before expiration
  • One portal at a time - Limits exposure by allowing only one active share
Why can I only have one active portal at a time?

To protect your privacy, NourAIsh limits you to one active portal link at a time. This prevents accidentally having multiple copies of your data floating around.

If you need to share with a different provider, you can either:

  • Wait for your current portal to expire
  • Revoke the current portal and create a new one

Food Recalls

What is the Food Recalls feature?

NourAIsh can show you current food recalls to help you stay informed about food safety. The Food Recalls feature displays:

  • Recent food recall announcements
  • Affected product names and descriptions
  • Recall reasons (contamination, undeclared allergens, etc.)
  • Distribution information
  • Links to official recall details

Recalls are available from United States (FDA), Canada (CFIA), and United Kingdom (FSA).

How do I view food recalls?

To view current food recalls:

  1. Go to the Health Hub tab
  2. Tap Food Recalls
  3. Browse the list of current recalls
  4. Tap any recall to see full details and the official source link

Recalls are fetched from official government databases and show the most recent announcements.

Can I choose which country's recalls to see?

Yes! You can select which country's food recalls you want to receive:

  1. Go to Settings > Food Recalls
  2. Select your preferred country:
    • United States - FDA food recall data
    • Canada - CFIA (Canadian Food Inspection Agency) recalls
    • United Kingdom - FSA (Food Standards Agency) alerts

The recalls displayed and notifications will be based on your selected country.

Can I get notifications about food recalls?

Yes! You can enable food recall notifications:

  1. Go to Settings > Food Recalls
  2. Toggle on New Recall Notifications

When new recalls are posted for your selected country, you'll receive a notification.

Where does the recall data come from?

Food recall data comes directly from official government sources:

NourAIsh fetches this data on-demand when you view the Food Recalls screen. No personal data is sent to access recall information.

Creating Recipes

How do I create a recipe?

To create a new recipe:

  1. Go to Log Food > Recipes
  2. Tap the + button to create a new recipe
  3. Add a recipe photo (optional)
  4. Enter the recipe name
  5. Set the number of servings
  6. Add cooking instructions (optional)
  7. Add your ingredients
  8. Choose how to add nutrition data and tap Save
Recipe Builder screen showing name, servings, and ingredients fields
What are the different ways to add ingredients?

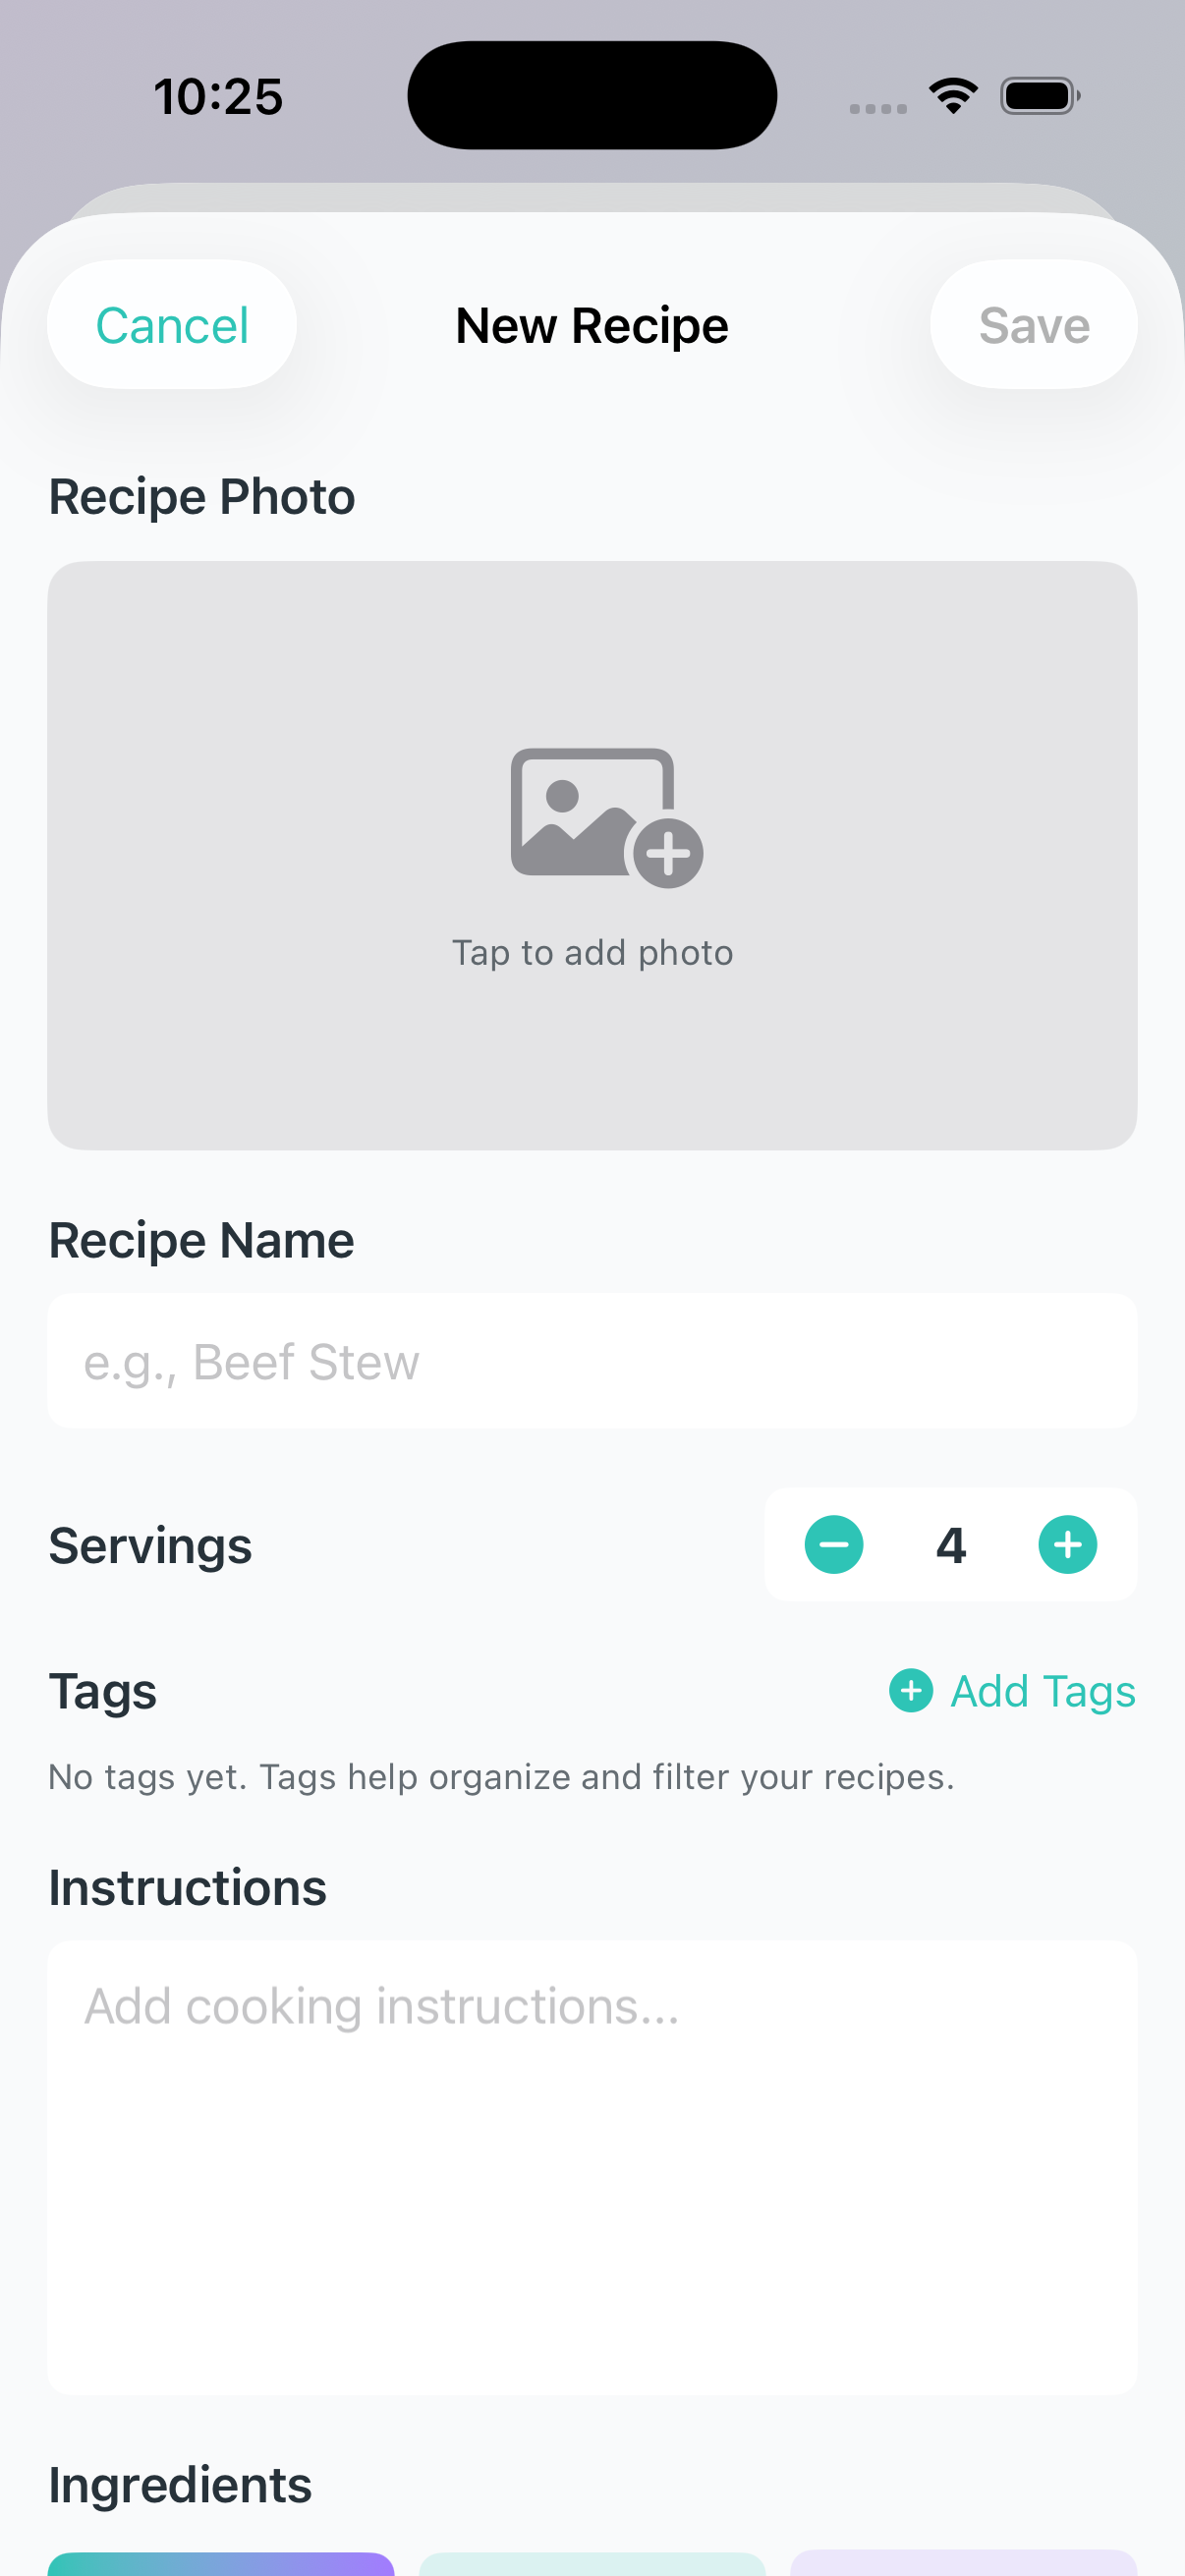
NourAIsh offers three ways to add ingredients to your recipe:

  • Add Manually - Enter one ingredient at a time with quantity and name
  • Paste List - Copy an ingredient list from a recipe website and paste it all at once
  • Import from URL - Paste a recipe URL and NourAIsh will extract the recipe name, instructions, and ingredients automatically
Tip: Importing from a URL is the fastest way to add recipes from sites like AllRecipes, Food Network, or other popular recipe websites.
How do I add nutrition information to my recipe?

After adding your ingredients, you'll choose how to add nutrition data:

  • Let AI Analyze - NourAIsh AI analyzes each ingredient and calculates per-serving nutrition automatically (requires NourAIsh subscription)
  • Enter Manually - Enter the per-serving nutrition totals yourself, like from a recipe website (free)
  • Skip for Now - Save the recipe without nutrition and add it later (free)
Nutrition method selection showing AI Analyze, Manual Entry, and Skip options
What's the difference between Free and Premium for recipes?

Here's what's available for free users vs. NourAIsh subscribers:

Free Features:

  • Create unlimited recipes
  • Add recipe photos, names, servings, and instructions
  • Add ingredients manually or by pasting a list
  • Import recipes from URLs (extracts recipe info)
  • Enter per-serving nutrition totals manually
  • Log recipes

NourAIsh Subscription:

  • All free features, plus:
  • AI Ingredient Analysis - Automatically analyzes each ingredient's nutrition
  • Per-Ingredient Breakdown - See exactly where nutrients come from in your recipe
  • AI Food Analysis - Describe meals naturally and get instant nutrition data
  • Daily AI Reports - Personalized nutrition insights
Note: You can always create recipes for free by entering the per-serving nutrition manually. The AI subscription makes it faster by automatically analyzing ingredients.
What's the difference between AI analysis and manual nutrition entry?

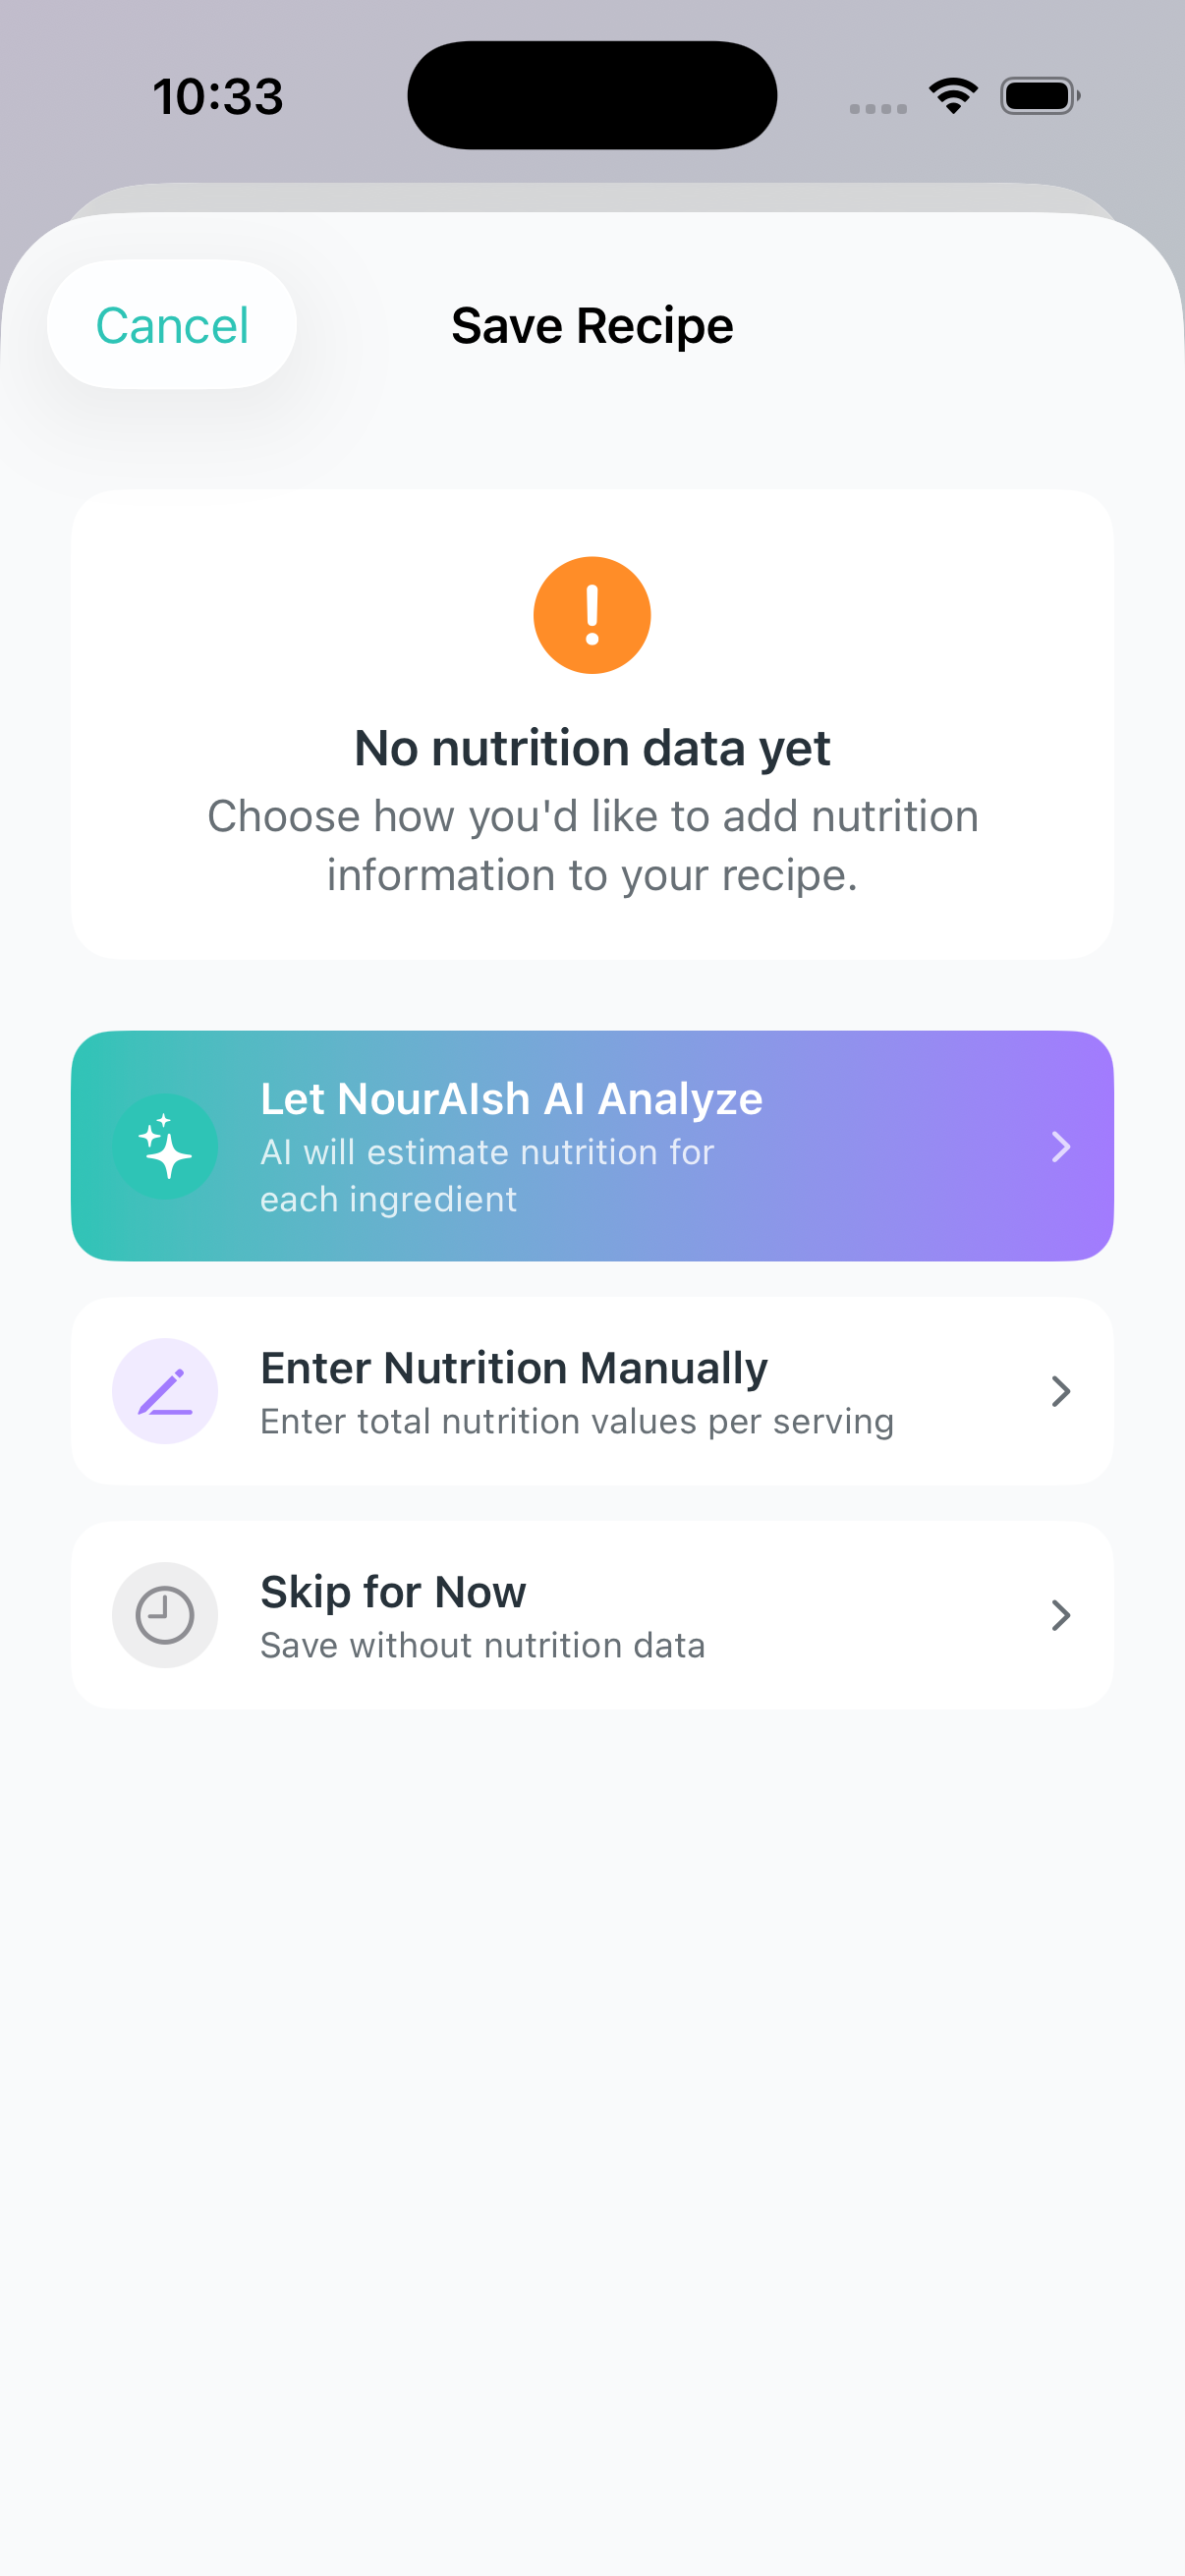
AI Analysis (Premium):

  • Analyzes each ingredient individually
  • Stores detailed per-ingredient nutrition data
  • Shows ingredient breakdown view (see which ingredients contribute the most sodium, calories, etc.)
  • Automatically calculates per-serving totals

Manual Entry (Free):

  • You enter the total per-serving nutrition values
  • Great when you already know the nutrition from a recipe website
  • Stores per-serving totals only (no ingredient breakdown)
  • Quick and simple if you have the numbers handy
Can I edit a recipe after creating it?

Yes! To edit a recipe:

  1. Go to Recipes and find the recipe you want to edit
  2. Tap on it to open the detail view
  3. Tap the Edit button
  4. Make your changes and tap Save

You can also add nutrition data to a recipe that was saved without it by using the "Add Nutrition" option in the recipe detail view.

How do I log a recipe?

To log a recipe:

  1. Go to Log Food > Recipes
  2. Find and tap your recipe
  3. Adjust the number of servings if needed
  4. Select the meal type (Breakfast, Lunch, Dinner, Snack)
  5. Tap Log

The nutrition will be calculated based on the number of servings you log.

Are AI nutrition values accurate?

AI-analyzed nutrition values are estimates based on generic food data. Keep in mind:

  • Values may not match the exact products you're using
  • Brand-specific variations aren't accounted for
  • You can edit any ingredient's nutrition values after analysis
Tip: For the most accurate results, verify key ingredients against package labels, especially for items where nutrition varies significantly by brand (like protein content in different yogurt brands).

Have more questions? Contact us at support@nouraish.com